

Netty源码分析--创建Channel(三)
先看一下我Netty的启动类
private void start() throws Exception {
        EventLoopGroup bossGroup = new NioEventLoopGroup(1);
        EventLoopGroup workerGroup = new NioEventLoopGroup();
        try {
            ServerBootstrap bootstrap = new ServerBootstrap();
            bootstrap.group(bossGroup, workerGroup).channel(NioServerSocketChannel.class)
                    .option(ChannelOption.SO_BACKLOG, 128)
                    .option(ChannelOption.SO_KEEPALIVE, true)
                    .handler(new LoggingHandler(LogLevel.INFO))
                    .localAddress(new InetSocketAddress(port))
                    .childHandler(new ChannelInitializer<SocketChannel>() {
                        protected void initChannel(SocketChannel ch) throws Exception {
                            ch.pipeline().addLast(new IdleStateHandler(5, 0, 0, TimeUnit.MINUTES));
                            ch.pipeline().addLast(new ProtobufVarint32FrameDecoder());
                            ch.pipeline().addLast(new ProtobufDecoder(ChannelRequestProto.ChannelRequest.getDefaultInstance()));
                            ch.pipeline().addLast(new ProtobufVarint32LengthFieldPrepender());
                            ch.pipeline().addLast(new ProtobufEncoder());
                            ch.pipeline().addLast(new HeartBeatServerHandler());
                            ch.pipeline().addLast(new XtsCoreServerHandler());
                        }
                    });
            ChannelFuture future = bootstrap.bind().sync();
            future.channel().closeFuture().sync();
        } catch (Exception e) {
            bossGroup.shutdownGracefully().sync();
            workerGroup.shutdownGracefully().sync();
        }
    }
Netty先创建了两个事件循环组 EventLoopGroup ,这个就对应了上文提到的模型, 第一个事件循环组的职责是 负责接收新的客户端连接 并 把客户端Channel注册到多路复用器上面。 第二个事件循环组的职责是 处理客户端的读写等事件。
Netty使用 ServerBootstrap 这个链式编程的方式把启动服务端的代码给串联起来,使用非常方便和优雅。所以我们在看源码的同时也要去好好品读Netty源码书写的巧妙,理解设计思想和方式,巧妙地运用到我们自己的代码中。接下来我会把源码贴出来,并把重要的部分进行解释和着重指出
看下 group 方法
public ServerBootstrap group(EventLoopGroup parentGroup, EventLoopGroup childGroup) {
        super.group(parentGroup); // 第一个事件循环组,我们叫父循环组吧,它是继续调用了父类的group方法,也就是 AbstractBootstrap 并且赋给 group 成员变量
        if (childGroup == null) {
            throw new NullPointerException("childGroup");
        }
        if (this.childGroup != null) {
            throw new IllegalStateException("childGroup set already");
        }
        this.childGroup = childGroup;  // 第二个事件循环组, 我们叫子循环组吧, 直接赋值给 childGroup 这个成员变量
        return this; // 返回自己,这就是链式编程的原因
    }
接下来是 channel 方法, 设置了 channal 的类型是 NioServerSocketChannel (当然客户端是 NioSocketChannel),这里在创建的时候用了反射的方法来创建实例,后面涉及到再具体说。
public B channel(Class<? extends C> channelClass) {
        if (channelClass == null) {
            throw new NullPointerException("channelClass");
        }
        return channelFactory(new ReflectiveChannelFactory<C>(channelClass)); // NioServerSocketChannel 使用了 ReflectiveChannelFactory 工厂封装,并且设置到了 AbstractBootstrap
                                                                              // 的 channelFactory 的这个成员变量中, 注意 这里的channal 是 父级 的 channal
}
.option 方法 是在设置 父级 的一些参数信息,这些就不说了, 当然这里 .handler(new LoggingHandler(LogLevel.INFO)) 方法 也是为父级的事件循环器设置的 handler 。
.childHandler(new ChannelInitializer<SocketChannel>() {   // 当然这里是设置 子事件循环组器的 handlers ,但是这里的 initChannel 方法不是在这里调用的,这个后面会具体提到。
                        protected void initChannel(SocketChannel ch) throws Exception {
                            ch.pipeline().addLast(new IdleStateHandler(5, 0, 0, TimeUnit.MINUTES));
                            ch.pipeline().addLast(new ProtobufVarint32FrameDecoder());
                            ch.pipeline().addLast(new ProtobufDecoder(ChannelRequestProto.ChannelRequest.getDefaultInstance()));
                            ch.pipeline().addLast(new ProtobufVarint32LengthFieldPrepender());
                            ch.pipeline().addLast(new ProtobufEncoder());
                            ch.pipeline().addLast(new HeartBeatServerHandler());
                            ch.pipeline().addLast(new XtsCoreServerHandler());
                        }
                    });
好了,接下来进入正式部分。
ChannelFuture future = bootstrap.bind().sync(); // 就是从这里的bind()进入
进入doBind方法
private ChannelFuture doBind(final SocketAddress localAddress) {
        final ChannelFuture regFuture = initAndRegister();
        final Channel channel = regFuture.channel();
        if (regFuture.cause() != null) {
            return regFuture;
        }
        ... 省略一大波代码
    }
进入 initAndRegister
final ChannelFuture initAndRegister() {
        Channel channel = null;
        try {
            channel = channelFactory.newChannel(); // 这里就是创建一个父级的channel
            init(channel);
        } catch (Throwable t) {
            if (channel != null) {
                // channel can be null if newChannel crashed (eg SocketException("too many open files"))
                channel.unsafe().closeForcibly();
                // as the Channel is not registered yet we need to force the usage of the GlobalEventExecutor
                return new DefaultChannelPromise(channel, GlobalEventExecutor.INSTANCE).setFailure(t);
            }
            // as the Channel is not registered yet we need to force the usage of the GlobalEventExecutor
            return new DefaultChannelPromise(new FailedChannel(), GlobalEventExecutor.INSTANCE).setFailure(t);
        }
      ...省略一大波代码
    }
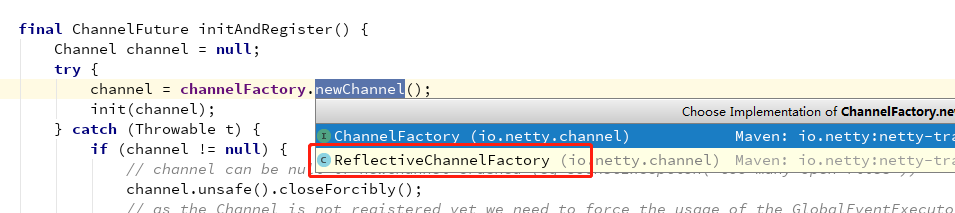
这就是我前面为什么着重指出 NioServerSocketChannel 使用了 ReflectiveChannelFactory 工厂封装 , 就是上图这里了。然后进入 ReflectiveChannelFactory
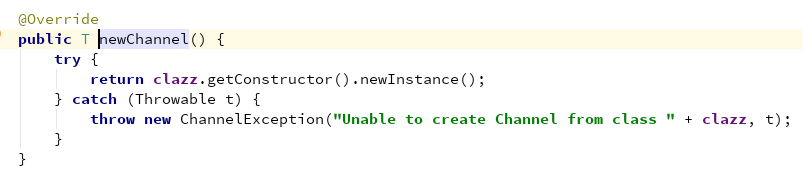
使用了 NioServerSocketChannel 的无参构造方法实例化这个类。ok,那我们来看下NioServerSocketChannel 的 无参构造方法。

传入一个默认的多路复用器创建器


使用它来调用 openServerSocketChannel() 方法来创建一个ServerSocketChannel, 具体这个方法就是NIO里面的内容了,有兴趣的自己去看一下。
看到这里,我们知道channel创建完成(为父级使用),返回到这里

大家千万不要忽视一点,这里有个this,我当时就没注意到这里,粗心了,导致其中有一步始终想不通,后来重新仔细看的时候,打自己的心都有了。
这里继续调用了另外一个有参的构造方法。

不断调用父类构造方法,就进入到
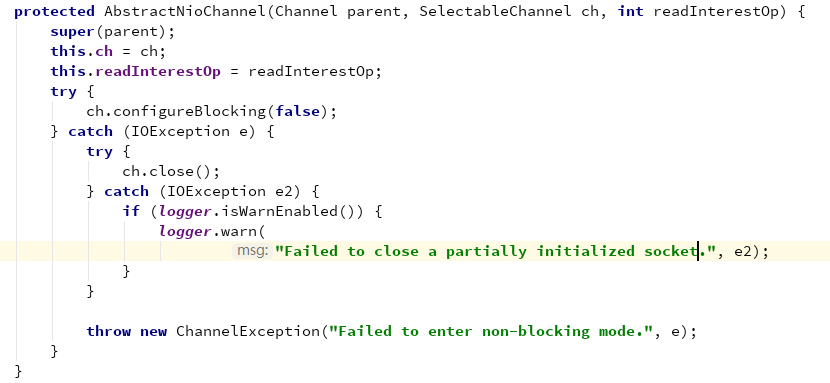
这里设置了父级的成员变量channel,并且把感兴趣的key设置为16(接收新的客户端),并且设置非阻塞。这里在第一篇启动NIO服务端的时候,也有这句,大家应该也记得。
我们继续看调用的父类构造方法。
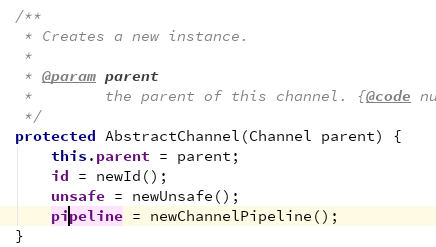
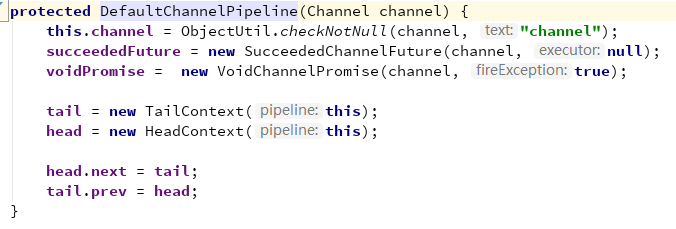
我们知道了为Channel设置了一个ID,并且创建了Pipleline.并且初始化了两个上下文分别为头和尾,通过链表链接。
我们说到这里,简单回顾一下Pipeline. 我们开看下ChannelPipeline官方说明
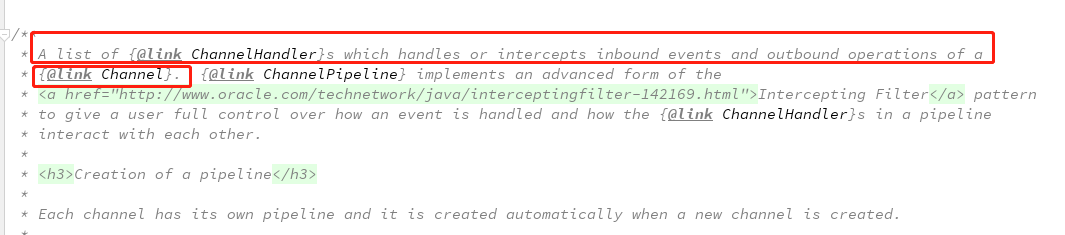
讲到了, Pipeline 是 Channel中出站和入站操作的处理器或拦截器的一个列表。同时官方给出了一个表单我也贴出来

下图说明了I/O读写事件是怎么在PipeLine中的Handlers中传递的。需要通过 ChannelHandlerContext, 例如 ChannelHandlerContext#fireChannelRead(Object) 和 ChannelHandlerContext#write(Object)

这点了解Netty的一下子应该就看得明白,后面设计到PipeLine的地方我们再展开讲解,继续回到NioServerSocketChannel 的有参构造方法,继续往下看。

这里为刚刚创建的channel创建了一个配置类,并且是一个内部类。传入了channel和套接字。
不断往下跟,看到这里

这里传入了一个小内存分配器,也就是说为这个channel初始化了一个分配器。
ok,我们来简单说下这个分配器,后面在Netty的内存模型部分,我们再细说。

构造方法,传入了三个默认值,并且说明了 默认分配缓冲区的大小为1024 ,最小是64,最大是65536
通篇看一下,看到了一个非常重要的静态代码块
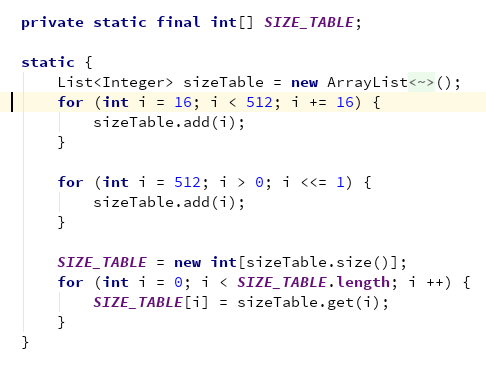
依次往sizeTable添加元素:[16 , (512-16)]之间16的倍数。即,16、32、48...496
然后再往sizeTable中添加元素:[512 , 512 * (2^N)),N > 1; 直到数值超过Integer的限制(2^31 - 1);
根据sizeTable长度构建一个静态成员常量数组SIZE_TABLE,并将sizeTable中的元素赋值给SIZE_TABLE数组。注意List是有序的,所以是根据插入元素的顺序依次的赋值给SIZE_TABLE,SIZE_TABLE从下标0开始。SIZE_TABLE为预定义好的以从小到大的顺序设定的可分配缓冲区的大小值的数组。因为AdaptiveRecvByteBufAllocator作用是可自动适配每次读事件使用的buffer的大小。这样当需要对buffer大小做调整时,只要根据一定逻辑从SIZE_TABLE中取出值,然后根据该值创建新buffer即可。

