DOCKER学习_001:Docker简介
一 Docker简介
1.1 docker由来
Docker的英文翻译是“码头工人”,即搬运工,它搬运的东西就是我们常说的集装箱Container,Container里面装的是任意类型的App。我们的开发人员可以通过Docker将App变成一种标准的、可移植的、自管理的组件,我们可以在任何主流的操作系统中开发、调试和运行。
从概念上来看,Docker和传统的虚拟机比较类似,只是更轻量级,更方便使用。Docker和虚拟机最主要的区别有以下几点:
- 虚拟化技术依赖的是物理CPU和内存,是硬件级别的;Docker是构建在操作系统层面的,复用操作系统的容器化技术,所以Docker同样可以运行在虚拟机上面。
- 虚拟机中的操作系统是一个完整的操作系统镜像,比较复杂;而Docker比较轻量级,我们可以用Docker部署一个独立的redis,就类似于在虚拟机当中安装一个redis应用,但Docker部署的应用是完全隔离的。
- 传统的虚拟机技术是通过快照来保存状态的;而Docker引入了类似于源码管理的机制,将容器历史版本一一记录下来,切换成本非常之低。
- 传统的虚拟化技术在构建系统的时候非常复杂;而Docker可以通过一个简单的Dockerfile文件来构建整个容器,更重要的是Dockerfile可以手动编写,这样应用程序开发都可以通过发布Dockerfile来定义应用的环境和依赖,对于持续交付非常有利。
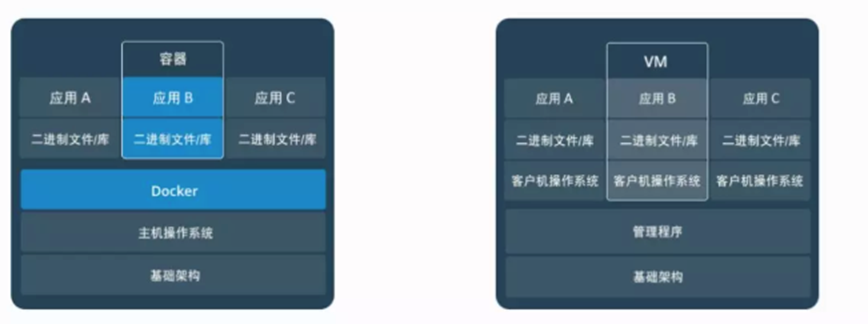
1.2 容器和虚拟化
下面是docker与虚拟机的简单对比图:
| 特性 | 容器 | 虚拟机 |
| 启动 | 秒级 | 分钟级 |
| 硬盘使用 | 一般为MB | 一般为GB |
| 性能 | 接近原生 | 弱于 |
| 系统支持量 | 单机支持上千个容器 | 一般几十个 |
| 管理效率 | 管理简单 | 概念里复杂 |
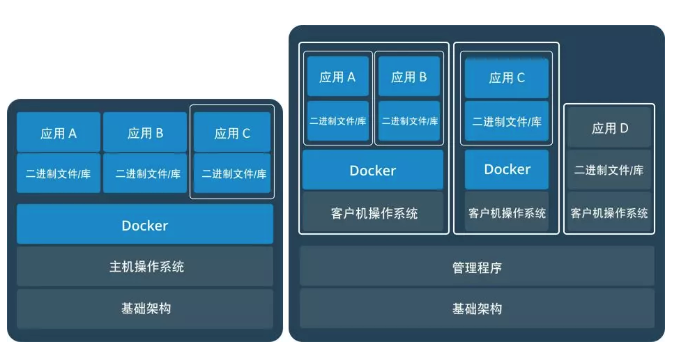
Docker运行在物理机上与运行在虚拟机上的对比:
二 容器的优势特性
2.1 使用原因
一个做好的应用容器长的就像一个装好了一组特定应用的虚拟机一样,比如我们现在想用redis,那我就找个装好了redis的容器就可以了,然后运行起来,我就能直接使用了。
那为什么不直接安装一个redis呢?肯定是可行的,但是有的时候根据每个人电脑的不同,操作系统的不同,redis的安装方法也各不相同。而且万一机器故障,应用迁移,所有当前机器上安装的应用还需要在新的机器上再全部重新安装一次。但是如果使用容器就要简单多了,你就相当于有了一个快速运行起来的虚拟机,而且方便快速移植。只要你能运行容器,redis的配置就省了。
2.2 特性
标准化
- 保证一致的运行环境
- 弹性伸缩,快速扩容
- 方便迁移
- 持续集成、持续交付与持续部署
高性能
- 不需要进行硬件虚拟以及运行完整的操作系统
轻量级
- 快速启动
隔离性
- 进程隔离
2.3 Docker引擎
Docker引擎是一个C/S 架构的应用程序
- 常驻后台进程Dockerd
- 一个用来与Dockerd交互的REST API Server
- 命令行CLI接口,通过与REST API进行交互(docker命令)
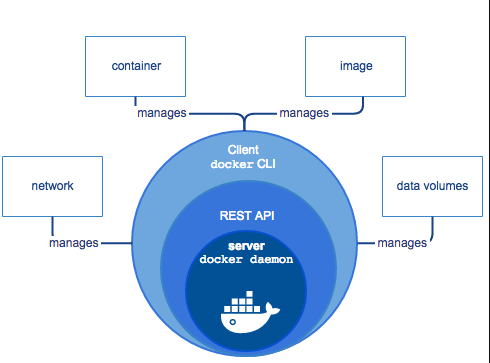
2.4 Docker架构说明
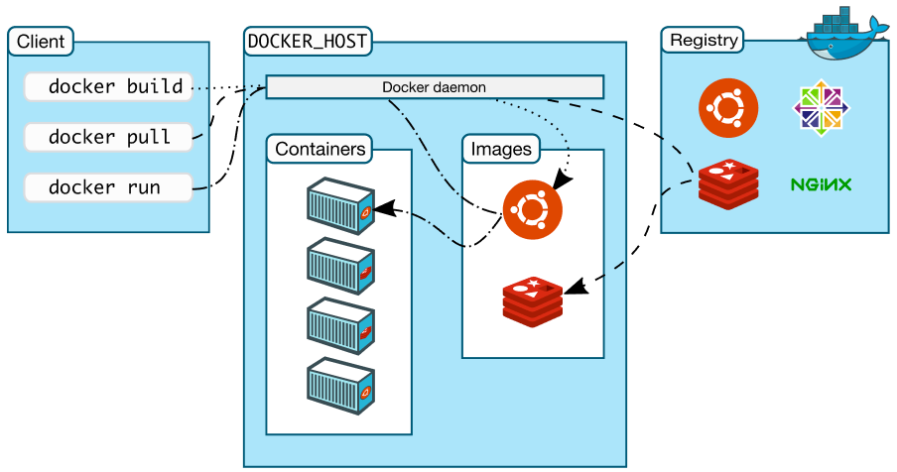
Docker使用C/S体系的架构,Docker客户端与Docker守护进程通信,Docker守护进程负责构建,运行和分发Docker容器。Docker客户端和守护进程可以在同一个系统上运行,也可以将Docker客户端连接到远程Docker守护进程。Docker客户端和守护进程使用REST API通过unix套接字或网络接口进行通信。
下面是Docker核心组件及元素说明:
- Docker Daemon: dockerd,用来监听Docker API的请求和管理Docker对象,比如镜像、容器、网络和Volume。
- Docker Client:docker,docker client是我们和Docker进行交互的最主要的方式方法,比如我们可以通过docker run 命令来运行一个容器,然后我们的docker client会把命令发送给上面的Dockerd,主它来负责处理。
- Docker Registry:用来存储Docker镜像的仓库,Docker hub是官方提供的一个公共仓库,而且Docker默认也是从Docker Hub上查找镜像的。当然你也可以很方便的运行一个私有仓库,当我们使用docker pull或者docker run命令时,就会从我们配置的docker镜像仓库中去拉取镜像,使用docker push时,会将我们构建的镜像推送到对应的镜像仓库中。
- Images:镜像,镜像是一个只读模板 ,带有创建docker容器的说明。一般来说,镜像会基于另外的一些基础镜像构建并加上一些额外的自定义功能。比如你可以构建一个基于centos的镜像,然后在这个基础镜像上面安装一个Nginx应用,这样就可以构建成属于我们自己的镜像了。
- Containers:容器,容器是一个镜像的运行实例。可以使用Docker REST API或者CLI来操作容器。容器的实质是进程,但与直接在宿主机执行的进程不同,容器进行运行于属于自己独立的命名空间。因此容器可以拥有自己的root文件系统、自己的网络配置、自己的进程空间,甚至自己的用户id空间。容器内的进程是运行在一个隔离的环境里,使用起来,就好像在一个独立于宿主的系统下操作一样。这种特性使得容器封装的应用比直接在宿主机运行更加案例。
三 Docker安装
3.1 Docker版本介绍
- docker-io:docker早期版本,支持到1.13,在centos 6.x系统上只能使用docker-io
- docker-ce:当前docker发行版本
- docker-ee:docker商业版本
本次使用使用的是Centos系统,安装zai Centos上
3.2 安装
https://developer.aliyun.com/mirror 阿里云镜像源

Docker CE 是免费的 Docker 产品的新名称,Docker CE 包含了完整的 Docker 平台,非常适合开发人员和运维团队构建容器 APP。
安装必要的系统工具
[root@docker-server1 ~]# yum install -y yum-utils device-mapper-persistent-data lvm2
[root@docker-server1 ~]# yum update
安装docker源
[root@docker-server1 ~]# yum-config-manager --add-repo http://mirrors.aliyun.com/docker-ce/linux/centos/docker-ce.repo
[root@docker-server1 ~]# yum makecache fast
[root@docker-server1 ~]# yum list docker-ce.x86_64 --showduplicates|sort -r
* updates: centos.communilink.net
Loading mirror speeds from cached hostfile
Loaded plugins: fastestmirror
 * extras: centos.communilink.net
docker-ce.x86_64            3:19.03.4-3.el7                     docker-ce-stable
docker-ce.x86_64            3:19.03.3-3.el7                     docker-ce-stable
docker-ce.x86_64            3:19.03.2-3.el7                     docker-ce-stable
docker-ce.x86_64            3:19.03.1-3.el7                     docker-ce-stable
docker-ce.x86_64            3:19.03.0-3.el7                     docker-ce-stable
docker-ce.x86_64            3:18.09.9-3.el7                     docker-ce-stable
docker-ce.x86_64            3:18.09.8-3.el7                     docker-ce-stable
docker-ce.x86_64            3:18.09.7-3.el7                     docker-ce-stable
docker-ce.x86_64            3:18.09.6-3.el7                     docker-ce-stable
docker-ce.x86_64            3:18.09.5-3.el7                     docker-ce-stable
docker-ce.x86_64            3:18.09.4-3.el7                     docker-ce-stable
docker-ce.x86_64            3:18.09.3-3.el7                     docker-ce-stable
docker-ce.x86_64            3:18.09.2-3.el7                     docker-ce-stable
docker-ce.x86_64            3:18.09.1-3.el7                     docker-ce-stable
docker-ce.x86_64            3:18.09.0-3.el7                     docker-ce-stable
docker-ce.x86_64            18.06.3.ce-3.el7                    docker-ce-stable
docker-ce.x86_64            18.06.2.ce-3.el7                    docker-ce-stable
docker-ce.x86_64            18.06.1.ce-3.el7                    docker-ce-stable
docker-ce.x86_64            18.06.0.ce-3.el7                    docker-ce-stable
docker-ce.x86_64            18.03.1.ce-1.el7.centos             docker-ce-stable
docker-ce.x86_64            18.03.0.ce-1.el7.centos             docker-ce-stable
docker-ce.x86_64            17.12.1.ce-1.el7.centos             docker-ce-stable
docker-ce.x86_64            17.12.0.ce-1.el7.centos             docker-ce-stable
docker-ce.x86_64            17.09.1.ce-1.el7.centos             docker-ce-stable
docker-ce.x86_64            17.09.0.ce-1.el7.centos             docker-ce-stable
docker-ce.x86_64            17.06.2.ce-1.el7.centos             docker-ce-stable
docker-ce.x86_64            17.06.1.ce-1.el7.centos             docker-ce-stable
docker-ce.x86_64            17.06.0.ce-1.el7.centos             docker-ce-stable
docker-ce.x86_64            17.03.3.ce-1.el7                    docker-ce-stable
docker-ce.x86_64            17.03.2.ce-1.el7.centos             docker-ce-stable
docker-ce.x86_64            17.03.1.ce-1.el7.centos             docker-ce-stable
docker-ce.x86_64            17.03.0.ce-1.el7.centos             docker-ce-stable
 * base: centos.communilink.net
[root@docker-server1 ~]# yum -y install docker-ce
[root@docker-server1 ~]# systemctl restart docker
[root@docker-server1 ~]# systemctl status docker
 docker.service - Docker Application Container Engine
   Loaded: loaded (/usr/lib/systemd/system/docker.service; disabled; vendor preset: disabled)
   Active: active (running) since Sat 2019-11-09 02:36:44 EST; 10min ago
     Docs: https://docs.docker.com
 Main PID: 62112 (dockerd)
    Tasks: 13
   Memory: 46.2M
   CGroup: /system.slice/docker.service
           └─62112 /usr/bin/dockerd -H fd:// --containerd=/run/containerd/containerd.sock

Nov 09 02:36:44 docker-server1 dockerd[62112]: time="2019-11-09T02:36:44.288676502-05:00" level=info msg="scheme \...=grpc
Nov 09 02:36:44 docker-server1 dockerd[62112]: time="2019-11-09T02:36:44.288692565-05:00" level=info msg="ccResolv...=grpc
Nov 09 02:36:44 docker-server1 dockerd[62112]: time="2019-11-09T02:36:44.288723178-05:00" level=info msg="ClientCo...=grpc
Nov 09 02:36:44 docker-server1 dockerd[62112]: time="2019-11-09T02:36:44.316499988-05:00" level=info msg="Loading ...art."
Nov 09 02:36:44 docker-server1 dockerd[62112]: time="2019-11-09T02:36:44.470346871-05:00" level=info msg="Default ...ress"
Nov 09 02:36:44 docker-server1 dockerd[62112]: time="2019-11-09T02:36:44.525457432-05:00" level=info msg="Loading ...one."
Nov 09 02:36:44 docker-server1 dockerd[62112]: time="2019-11-09T02:36:44.545391836-05:00" level=info msg="Docker d....03.4
Nov 09 02:36:44 docker-server1 dockerd[62112]: time="2019-11-09T02:36:44.545511423-05:00" level=info msg="Daemon h...tion"
Nov 09 02:36:44 docker-server1 dockerd[62112]: time="2019-11-09T02:36:44.565917783-05:00" level=info msg="API list...sock"
Nov 09 02:36:44 docker-server1 systemd[1]: Started Docker Application Container Engine.
Hint: Some lines were ellipsized, use -l to show in full.
3.3 docker配置文件说明
在docker-ce中,已废弃/etc/sysconfig/docker这种配置方式,转而采用/etc/docker/daemon.json来配置
下面简单列一下daemon.json的配置项与说明:
{
 "api-cors-header": "",
 "authorization-plugins": [],
 "bip": "",
 "bridge": "",
 "cgroup-parent": "",
 "cluster-store": "",
 "cluster-store-opts": {},
 "cluster-advertise": "",
 #启用debug的模式,启用后,可以看到很多的启动信息。默认 false
 "debug": true,
 "default-gateway": "",
 "default-gateway-v6": "",
 "default-runtime": "runc",
 "default-ulimits": {},
 "disable-legacy-registry": false,
 #容器DNS的地址,在容器的/etc/resolv.conf 文件中可查看
 "dns": ["192.168.80.1"],
 "dns-opts": [],
 "dns-search": [],
 "exec-opts": [],
 "exec-root": "",
 "fixed-cidr": "",
 "fixed-cidr-v6": "",
 #已废弃,使用data-root代替
 "graph": "/var/lib/docker",
 #Docker运行时使用的根路径,根路径下的内容稍后介绍,默认/var/lib/docker
 "data-root": "/var/lib/docker",
 "group": "", #Unix套接字的属组,仅指/var/run/docker.sock
 "hosts": [], #设置容器hosts
 "icc": false,
 "insecure-registries": [],
 "ip": "0.0.0.0",
 "iptables": false,
 "ipv6": false,
 "ip-forward": false,
 "ip-masq": false,
 "labels": ["nodeName=node-121"]
 "live-restore": true,
 "log-driver": "",
 "log-level": "",
 "log-opts": {
    "max-file": "5",
    "max-size": "50m"
 },
 "max-concurrent-downloads": 3,
 "max-concurrent-uploads": 5,
 "mtu": 0,
 "oom-score-adjust": -500,
 "pidfile": "", #Docker守护进程的PID文件
 "raw-logs": false,
 "registry-mirrors": ["xxxx"], #镜像加速的地址,增加后在 docker info 中可查看。
 "runtimes": {
 "runc": {
 "path": "runc"
 },
 "custom": {
 "path": "/usr/local/bin/my-runc-replacement",
 "runtimeArgs": [
 "--debug"
 ]
 }
 },
 "selinux-enabled": false, #参考:Docker的启动参数
 "storage-driver": "overlay2",
 "storage-opts": [],
 "swarm-default-advertise-addr": "",
 "tls": true, #参考:Docker的启动参数
 "tlscacert": "", #参考:Docker的启动参数
 "tlscert": "", #参考:Docker的启动参数
 "tlskey": "", #参考:Docker的启动参数
 "tlsverify": true, #参考:Docker的启动参数
 "userland-proxy": false,
 "userns-remap": ""
 }
docker systemd启动说明
[Unit]
Description=Docker Application Container Engine
Documentation=https://docs.docker.com
BindsTo=containerd.service
After=network-online.target firewalld.service containerd.service
Wants=network-online.target
Requires=docker.socket

[Service]
Type=notify
# the default is not to use systemd for cgroups because the delegate issues still
# exists and systemd currently does not support the cgroup feature set required
# for containers run by docker
ExecStart=/usr/bin/dockerd -H fd:// --containerd=/run/containerd/containerd.sock
ExecReload=/bin/kill -s HUP $MAINPID
TimeoutSec=0
RestartSec=2
Restart=always

# Note that StartLimit* options were moved from "Service" to "Unit" in systemd 229.
# Both the old, and new location are accepted by systemd 229 and up, so using the old location
# to make them work for either version of systemd.
StartLimitBurst=3

# Note that StartLimitInterval was renamed to StartLimitIntervalSec in systemd 230.
# Both the old, and new name are accepted by systemd 230 and up, so using the old name to make
# this option work for either version of systemd.
StartLimitInterval=60s

# Having non-zero Limit*s causes performance problems due to accounting overhead
# in the kernel. We recommend using cgroups to do container-local accounting.
LimitNOFILE=infinity
LimitNPROC=infinity
LimitCORE=infinity

# Comment TasksMax if your systemd version does not support it.
# Only systemd 226 and above support this option.
TasksMax=infinity

# set delegate yes so that systemd does not reset the cgroups of docker containers
Delegate=yes

# kill only the docker process, not all processes in the cgroup
KillMode=process
MountFlags=slave     # 解决目录被其它的容器挂载使用,导致已经退出的容器无法被删除的问题
[Install]
WantedBy=multi-user.target
重启Docker
[root@docker-server1 ~]# systemctl restart docker
[root@docker-server1 ~]# systemctl status docker
---------------------------------------------------------------------------
个性签名:我以为我很颓废,今天我才知道,原来我早报废了。
如果觉得本篇文章最您有帮助,欢迎转载,且在文章页面明显位置给出原文链接!记得在右下角点个“推荐”,博主在此感谢!

